
Ear training is key to becoming a better guitar player. In fact, ear training (done right) can transform your entire experience of listening to and playing music. But how exactly should you train your ears as a guitar player? Which of all the ear training apps, tests and exercises will help you improve?
This article will answer those questions and help you take the next step in your journey towards awesome ears. You’ll learn how ‘ear training’ is actually made up out of three core skills, and that there are different exercises for each skill.
Spoiler: most ear training programs train a completely different skill than the one guitar players need most in their day-to-day playing. So if you’ve found that even though your ear training efforts somehow haven't impacted your playing yet, read on!
You’ll also learn about the nine most important ear training exercises for guitar, and which of them will be most effective for you.
When you do it right, training your ears can be one of the most rewarding things you’ll ever do. It can provide an enormous sense of freedom as you play music, and deepen your understanding of the music your hear.
So, before we get into the nitty gritty of the exercises, let’s take a quick look at all the cool things that training your ears will allow you to do!
What is ear training for?
Here are just a few examples of why training your ears is awesome:

You hear a cool song somewhere and want to learn it. Instead of looking up a TAB or googling the chords, you simply figure out how to play the song by ear.

You’re in the rehearsal room and your band mate starts playing a few chords. A melody pops into your mind and you jump in and play it right away.

You’re writing a song and hear a chord change in your mind. Your hands intuitively float towards the right place on the fretboard and you play the chord almost before you realise it.

You’re watching a movie and there’s something about the soundtrack that you really like. You grab your guitar and quickly manage to figure out how to play that part of the soundtrack. As you play around with the part, it inspires you to write a new song.
In short, ear training can help you pretty much anytime you’re playing, listening to, or even just thinking about music! In fact, training your ears will transform your entire experience of music.
So how does ear training do this?
It all comes down to the three core ear training abilities.
The 3 core ear training abilities
This is your ability to hear music in greater detail. To be able to pick out the different instruments playing on a track, note by note. Training your ears can turn your experience of listening to music from watching an a grainy, 15-year-old YouTube clip, to watching an HD 4K video.
This is your intuitive sense of what your hands need to do to get a certain sound out of your instrument. To hear something in your mind and to be able to play that on your guitar.
This is your ability to hear music and identify things with the proper music theory term. It allows you to say things like 'this chord is minor' or 'that note is a major second higher than the note before it'.
This distinction is useful to make, because different exercises target different skills. Most ear training apps focus on skill #3 (recognising musical elements). They have tests where you hear something like a chord, and then have to tell what chord type it is, for example.
But it actually makes more sense to start with the first two skills. As musicians such as Victor Wooten and academics like Edwin E. Gordon have pointed out, music is a lot like language. And it makes sense to learn music in a similar way.
When kids learn to speak their native language, they go through three stages.
- For the first 6 to 12 months of their lives, they listen to all the sounds around them.
- After that, they start trying to reproduce the sounds they hear. This is ‘babble speech’ at first. Fairly quickly though, they start to form their first words, which turn into simple sentences until eventually they’re fluent speakers.
- Once kids are fluent and speak a language almost perfectly, they start learning about grammar. This isn’t to help them speak their language (they already know how), but to give them a better understanding of what they’re doing and to get rid of lingering mistakes.
In music, we can do the same thing. It makes sense to start our ear training by focusing on becoming better listeners and hearing in more detail (skill #1) and reproducing the things we hear (playing by ear, skill #2).
Especially as guitar players, these two skills are very useful and rewarding to learn. These are skills you’ll use all the time when you’re working on a new song at home, jamming in the rehearsal room or playing a solo on stage.
Another cool thing about these skills is that they’re largely intuitive. That means that as you develop them they’re ‘always on’. You can’t help but hear music in more detail than non-musicians with less fine-tuned ears. And when you hear a melody in your head, you’ll ‘just know’ what frets you need to play to get that melody out of your guitar.
Finally, developing these two skills will help you a lot when you start to work on skill #3 more, recognising musical elements. For example, you might hear two chords and immediately have a sense of how you’d play that on the guitar fretboard. And if you know your fretboard well enough, that will help you connect what you heard to music theory. Your intuitive sense of how to play something will merge with your theoretical understanding of what that thing is. This is super, super powerful and incredibly useful.
So, up next we’ll discuss 9 different ways to train your ears. The order is not random: this is the best order for guitarists who want ear training to benefit them in their day-to-day playing.
Let’s dive in!
Exercise 1
Figure out riffs and melodies by ear
In my private teaching, I do this even with complete beginners. Sometimes they think it’s a little scary at first, but students are all pretty shocked at how much better they get at learning songs by ear after a just a few weeks. The first song or melody you figure out by ear will probably take you quite some time. But with each note you figure out, you’ll get faster and faster at it.
To learn how to do this, check out this step-by-step guide on how to learn songs by ear. It explains exactly how the process of figuring out a song by ear works.
The basic process is simple though. Listen to the first note, find it on your fretboard, write it down and go on to the next note.
In fact, let’s do this right now! Grab your guitar and we’ll figure out a short guitar riff by ear. I’ll give you note-by-note instructions.
Hope you enjoyed figuring out that quick little riff! This exercise is the first lesson from Make Your Ears Awesome: Kick-Starter. To figure out a couple more tunes like this, enroll in the sample course by clicking the button below.
If you had some experience with figuring out songs already, you might like a little bit more challenge. If so, check out this next riff. In this next exercise, there are no more note-by-note instructions, so it’s a bit tougher!
Hope you got that one too! For a few more tunes like this, check out Make Your Ears Awesome: Riffs and Melodies. Click the button below to try the first couple of lessons for free.
Exercise 2
Improvisation
Improvisation is another excellent way to strengthen that connection between your head and your hands. The difference is of course, that you’re not repeating notes you hear on a recording, but playing the notes you come up with yourself.
Now, if you’ve never improvised before, this might seem pretty daunting. Perhaps you’ve tried improvising or soloing and the results were… uninspiring. But improvising doesn’t have to be difficult or complicated. We can get started with a few simple exercises that are a lot of fun. You’ll find yourself getting better at these exercises fairly quickly (within days or weeks, depending on how often you do them). For more details on these exercises, check out section 3 of this article on guitar improvisation.
Now, it’s important to keep in mind that the goal of these exercises is to break down the barrier between your head and your hands. To strengthen the connection between your musical imagination and your fingers.
Because of this, with any improvisation exercise you do, I want to encourage you to really tune into your musical imagination and play what you hear in your head. For us guitar players, it can be tempting to learn a shape on the fretboard and simply play the notes that we know are ‘correct’ (or rather: ‘not wrong’).
Instead of starting from a fretboard pattern, you want to put your musical imagination in the driver’s seat. You might not realise it, but you have been training your musical intuition through thousands of hours of listening to music. On a deep level, you know what good music sounds like. And your musical imagination wants to do nothing more, than come up with something that makes musical sense.
Compare it to language. Go ahead and try to say a string of random words. Surprisingly difficult right? It's hard to speak gibberish like that, because your brain has been wired to form logical sentences that make sense. Your musical imagination is exactly like this. It’s wired to make musical sense.
Long story short: listen to your musical imagination! It’s not just better ear training, it also makes your improvisation sound better!
Exercise 3
Learn chord progressions by ear
Doing this is great ear training for several reasons.
It requires you to listen intently to the sound of each chord, which really makes the sound stick in your ears. But you’re not just listening to the sound of individual chords. You’re hearing the chords as they’re being used in a song. This gives you a better and better sense of how different chord types work together to create harmonies that sound good. Moreover, you’re training your ears to ‘dissect’ harmony in the situation you need it the most: in actual music (as opposed to dry exercises).
But ear training benefits aside for a moment, being able to learn a chord progression by ear is a really useful and cool skill to have regardless. It’s great to not have to rely on the internet when you want to play a cool new song you’ve heard. (Especially because so many of the chords online simply aren’t correct). As you get better at this, googling the chords to a song will seem like way more trouble than simply giving the track a listen and figuring them out yourself.
So, how do you actually go about figuring out chord progressions by ear?
For a detailed explanation on figuring out chord progressions, check out section 2 of this guide to learning songs by ear. I’ll give you two important takeaways from the article here though.

First, when it comes to harmony, the bass is the boss. The lowest note in music determines how all other notes will sound. So when we’re figuring out chord progressions, the first the we listen to is the bass. Of course, as music listeners, we usually focus our attention on things that are easier to hear, such as vocals and guitar riffs. But with practice, you’ll get better and better at tuning into the bass. (If you’re interested in getting better at hearing the bass, check out Make Your Ears Awesome: Bass.)

Second, whereas you can start learning melodies by ear without any knowledge of theory, this is a bit different for figuring out chord progressions by ear. You need to know how to play a bunch of chords. After all, to figure out chords in a song by ear, you need to know how to play those chords first, right?
This is a bit tricky of course. How can you tell if you know the chords in a song, before you figure out that song? This problem was one of the reasons, I created a Make Your Ears Awesome: Chord Progressions. The course has over 50 songs that all stick to ‘open guitar chords’. To be precise, that’s: E, Em, F, G, A, Am, C, D, Dm.
So, you don’t need a huge chord library before you can get started though. If you know your beginner guitar chords there are already tons of songs you can learn by ear right now.
Let’s check out a tune by Nick Cave. Scroll down to the video and take a listen to the first twenty seconds (the video will loop that automatically). If you can, try to notice the bass guitar.
Next, listen again. This time focus on the bass guitar. Notice how up until 0:18, it actually only plays two different notes. At 0:04 it starts playing the first note. Then at 0:11 it starts playing the second note, before it returns to the first note again at at 0:15. When you find those two notes, you’ve figured out both of the chords in this song! The option you can pick from are E, A and D. So fill in the chord scheme below and check if you got it right!
(Note: I’ve added ‘repeat’ to the second bar. This means you can fill in the same chord as the previous bar.)
Liked this? If you’re a StringKick All Access member, you can continue with the rest of the course, which takes you through many more great songs by artists ranging from Jimi Hendrix, CCR and Bob Dylan to REM, Norah Jones, Arctic Monkeys and The Black Keys.
Not a member yet? You can take the first couple of songs for free. Click the button below to enroll in the free sample course!
Exercise 4
Analyse riffs and melodies
The next step, is to combine that musical intuition with the ‘rational’ part of your brain. To learn more about the underlying structure of music by learning music theory.
Now, you wouldn’t be the first person in history to think that music theory is a bit dull and boring. But with the right approach, learning theory can actually be both interesting and useful.
The key is to keep it is practical as possible. This comes down to two things:
- You need to understand how the theory you learn applies to the guitar fretboard.
- You want to have examples of the theory in action in real music. After all, music theory without the music is just math.
To keep this article focused, I won’t explain any music theory here. For this next step, you'll need to know about intervals and how scales are constructed from those intervals.
When you know about guitar intervals and scales (from this point on, I’ll assume you do), you can analyse how a certain melody is constructed. You can examine how a melody ‘fits within the scale’ so to speak. To make that a bit more concrete, check out this analysis of a melody.

As you can see, the melody starts on the root (R) and goes up to the major third (M3), perfect fourth (P4) and perfect fifth (P5). It then works it's way back down to end on the root note (R), after briefly touching upon the major second (M2).
Let’s give that a shot ourselves! We’ll analyse the opening riff in this song by the Shins.
Hope you enjoyed doing that quick analysis! This quick exercise was just one of many from Music Theory from Scratch.
So check out that course to learn more about this. If you’re a StringKick All Access member, it’s of course fully included in your membership!
Exercise 5
Singing Scales
The best way to do that is to produce that sound ourselves. In other words: to sing. Now, I know singing exercises can be tough and a little awkward, but they’re very effective. Once you can sing something, recognising it becomes super easy.
The good news is that these singing exercises are not about becoming the next Adele or even about sounding good. Also, if you prefer humming is completely fine too. (It can even be a little easier to hear yourself when you hum.)
We’ll start with the major scale. First, take a listen to what that sounds like.
Now, here’s how you would play that on guitar:

You’ll notice that I haven’t added fret numbers to this diagram. That’s because you can play this pattern in any position, and it will still be the major scale! So pick a position that feels comfortable for your voice. To play along to the scale above though (which is in C major), start in the eighth fret.
Exercise 1
We’ll start simple and sing the scale up and down. Here’s how that sounds:
Sing along to the recording a few times, and then try it on your own.
Once you feel (sort of) comfortable doing that, we’ll sing the scale ‘in numbers’. This helps make you more aware of ‘where you are’ in the scale.
On the fretboard, the numbers look like this:
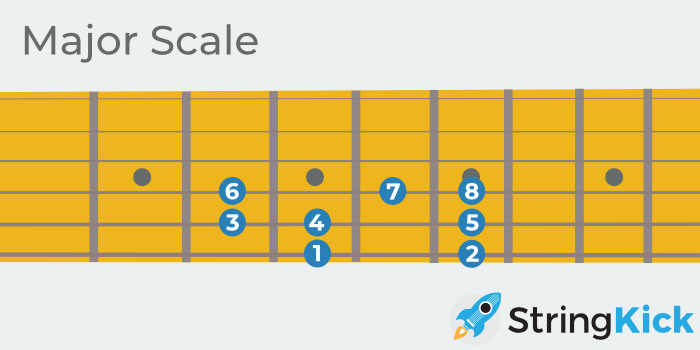
Now, as guitar players, we can make this exercise even more useful.
When you’re singing the scale, imagine how you would play it on the fretboard and which finger you’d use. As you sing, close your eyes and visualise the fretboard pattern. With each note you sing, lightly tap the finger you’d use to fret that note against your thumb. For the major scale that would be these fingers:
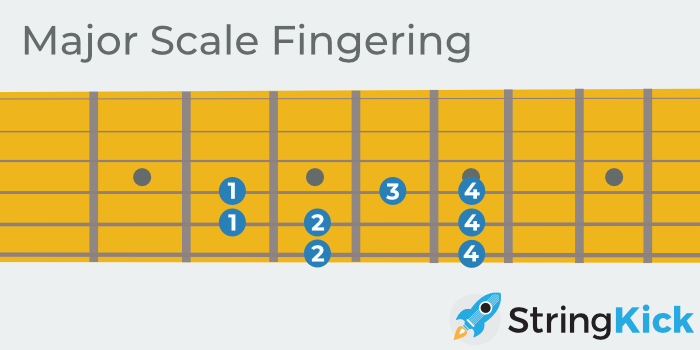
(1=index, 2=middle, 3=ring, 4=pinky)
The great thing about this exercise, is that you’re strengthening several types of memory at once. Aural (the sound of the scale), visual (what it looks like on the fretboard), tactile (what it feels like for your fingers) and theoretical (the number in the scale, also known as the ‘scale degree’).
Exercise 2
Next up, we’ll start to play around with the scale a bit more. Instead of simply going up and down the scale, your mission (should you choose to accept it), is to sing the following pattern.
1
1 2 1
1 2 3 2 1
1 2 3 4 3 2 1
Etc.
Here’s what that would sound like.
For the best results, use the same approach as we saw in the last exercise:
- Sing the numbers
- Imagine the fretboard pattern as you sing
- Tap the your fingers against your thumb as you sing
- Sing along to a recording first, then sing without help.
Exercise 3
Up next, sing sing the following pattern. Again, use the approach described above for the best results.
1 2 1 3 1 4 1 5 1 6 1 7 1 8
Exercise 4
This last exercise is similar to exercise #3, but switched around. We’ll start at the ‘top’ of the scale and move our way down. So:
8 7 8 6 8 5 8 4 8 3 8 2 8 1
The natural minor scale
Of course, you can do all of these exercises for other scales as well! After the major scale, the most important on to tackle is the natural minor scale.
Exercise 6
Sight singing
This might seem pretty difficult, but it’s really only the logical next step from everything we’ve done up until now.
In the last scale singing exercises, we went up and down the scale and sometimes made jumps from one place in the scale to another.
Sight singing is pretty much the same thing, just with a bit more variation. (And a bit more music, making it more fun!)
Let’s see how we can practice this.
We’ll start by taking another listen to the major scale.
Ok! Now for the next step: let's start singing!
When you hit the play button on the exercise below, the music will start and certain notes will light up. The challenge for you is to sing those notes! After two times, you'll get the 'answer' as the melody starts playing as well.
So with the sound of the major scale in mind, as you can hear above, try and sing this melody. (Note: if you want to give yourself more time, you can click the little blue progress bar to skip to the start of the track.)
Hope that went well for you!
Here’s another exercise, while we’re at it.
These exercises are part an upcoming ear training course. (It doesn’t even have a name yet.) As an All Access Member, you'll be the first to hear about it once it's out!
Exercise 7
Melodic Dictation
Now, the term 'melodic dictation' might sound a little 'schoolish'. And yes, melodic dictation is a popular exercise in music schools, where students have to listen to a piece of music and write down what they hear on a piece of sheet music.
But actually, this exercise helps develop a really awesome ability. Yes, it allows you to jot down a melody you hear in your head (when you’re away from your instrument). But it also deepens your understanding of music. It allows you to listen to a piece of music and understand how it is constructed simply by listening to it.
The key to this is to hear the underlying structure in the music, or in the melodies. So, like we've done in the last exercises, we'll won't focus on note names (i.e. 'this is an A, this is a Bb'), but on where each note is in the scale.
As you might have noticed, melodies revolve around the root note. (i.e. the first note in the scale). They always ‘want’ to get back to that root note. You need to become aware of that tension and recognise the sound of a scale becoming ‘at rest’ when it returns to the root note.
Let’s take a look at how that would work. In the exercise below, we’ll figure out a melody entirely by ear (and without your instrument!). To make it a bit easier, let me tell you that it starts on the root note. Check it out!
Of course, we can do this for ‘real’ songs as well! Check out this Radiohead ballad and see if you can figure it out. Be sure to slow it down using the button below the video if it helps.
Hope you enjoyed these exercises! Both of them are part of an upcoming course on ear training, which will have dozens more exercises like this.
So keep an eye out for it!
Exercise 8
Analyse chords and progressions
Because this is not a theory article, I won’t explain this in great detail here. The (very) short version is that chords that sound like they belong together, all use notes from the same scale. When a chord progression consists of chords that are all based on the same scale, we call that ‘diatonic’.
For example, when we only use notes from the major scale, we can ‘build’ the following chords:
As you can see, each chord is given a Roman numeral. These Roman numerals allow us to easily see the same patterns come up in the songs we analyse. Two super common examples are the I - IV - V progression and the ii - V - I. (Said out loud, that’s “two five one progression” and “one four five progression”.)
For example, check out this analysis:
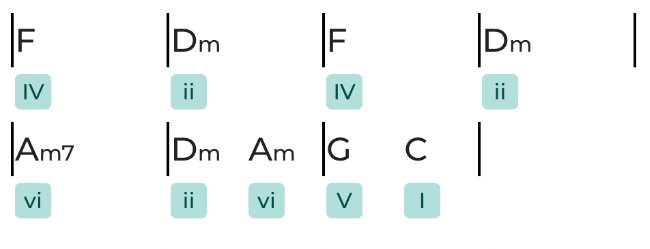
Of course, we can give this a try ourselves too! Let’s analyse this song by The Cure.
To give you a little help, this song is in the key of A, which means it’s based on the A major scale. To see the chords that fit in that key, scroll up to the image above. Using that, see if you can analyse the chord progression in this song!
Hope you enjoyed that!
For more exercises using real songs, check out Music Theory from Scratch. The course explains the underlying theory in much more detail of course (intervals on guitar, scales, chord construction and more), and has many more songs that will help you understand how all the theory applies to real music.
Of course, if you’re a StringKick All Access member, the course is fully included in your membership, so you can get access straight away!
Exercise 9
‘Classic’ recognition and identification exercises
In these exercises, an app or your teacher plays a sound, and you have to tell what it is. For example:
- Play two notes, tell the interval
- Play a chord, tell what the chord type is
Now, there are two reasons that I’m not a huge fan of these exercises.
1. Testing something is not the same as practicing it. These identification exercises are largely about ‘checking if you already know how to do it’. By contrast, exercises where you have to produce a sound yourself (i.e. sing or hum it) are much more effective.
2. These exercises (mostly) test outside a musical context. Music is not about hearing a chord or two notes in isolation. It’s like training in laboratory conditions, before you go out and explore jungle.
That said, these exercises can still be useful in your ear training journey. For example, after doing a ton of singing exercises, it’s nice to be able to check your progress using these recognition tests. You might find that you’re still having trouble recognising a certain interval or chord, which means there’s still more work to do there.
In short, these tests should not be the ‘main meal’ of your ear training practice, but perhaps a ‘side dish’, if that makes sense!
What’s your next step?
I hope this guide has show you what exercises will be most effective for you right now, wherever you are in your journey of becoming a better guitar player and musician.
A final note: I put these exercises in an order, but that doesn't mean that once you've completed one, you forget about it and move on to the next. For example, once you get into the habit of figuring out riffs, melodies and solos by ear, you'll be doing that for the rest of your musical journey! Myself, even after playing for close to 20 years, I keep improving and getting better at it. That's true for pretty much all these ways to train your ears!
If you have any questions about ear training, feel free to ask me anything! I’m happy to help you out.


![Title image for How to Learn Songs by Ear [Complete Step-by-Step Guide]](https://www.stringkick.com/wp-content/uploads/2015/04/Learn-Songs-By-Ear-Orange.png)
![Title image for How to Improvise On Guitar [Easy Guide]](https://www.stringkick.com/wp-content/uploads/2019/05/Improvise-Purple-315x175.png)

![Title image for The Major Scale on Guitar [Simple Explainer]](https://www.stringkick.com/wp-content/uploads/2023/03/Major-Scale-Guitar.png)
![Title image for Guitar Intervals: Explained Easily [Full Guide]](https://www.stringkick.com/wp-content/uploads/2023/05/Guitar-Intervals-Title-Image.png)

