
It might look like magic. But the ability to learn songs by ear isn’t some innate, natural talent that you’re born with. Instead, it’s a skill that you can learn with the right kind of practice.
And it’s well worth the practice! Figuring out songs by ear is one of the most rewarding skills you can learn as a musician, as it will impact almost every aspect of your playing.
So, in this article, I’ll tell you everything you need to know about learning songs by ear. First, I’ll explain in detail how exactly this awesome skill will help you. In section 2, you’ll learn how to figure out riffs and melodies by ear. Section 3 will show you how to work out chord progressions by ear. And in section 4, I’ll share some more ear training resources with you.
In short, in this guide you’ll discover exactly how learning songs by ear works and how you can become better and better at it.
Let’s dive in!
Introduction
Four reasons why learning songs by ear is awesome
So in this section, you’ll find out about the many ways that learning songs by ear will impact your musical journey. You’ll find out how it won’t just help you grow as a musician, but transform your experience of music.

1. Learning songs by ear is a super effective way to train your ears
The first couple of years I played guitar, I’d regularly hear that ear training ‘is good for you’. I didn’t really know why (tabs seemed to be working fine), but sure, I listened. And so, I tried all sorts of apps, books and exercises. Most of them were focused on recognising things like chord types, scales and intervals. I got better at the exercises eventually, but it never seemed to impact my playing.
My ears improved dramatically when I stopped using tabs, and started to use my ears all the time. I’d figure out licks, vocal melodies, bass lines, chord progressions and stuff I heard on tv. And that’s when I really started to notice my experience of playing guitar change. Instead of ‘memorising frets’, playing became more intuitive. Sometimes I thought I’d forgotten a note or chord, but my fretting hand would automatically play the right thing. Slowly but surely, it started to become second nature to hear something and just play it immediately.

2. Learning by ear develops your inner musician
When you learn a song by ear, you’re strengthening the connection between your head and your hands. You’re training your ability to clearly hear a sound in your head and to then get that sound out of your instrument. This skill is a core part of your musicality. It’s the key to musical expression and it impacts pretty much every aspect of your playing: playing by ear, improvisation, songwriting, timing, performing live… It's why I like to start figuring out songs by ear even with complete beginners: it's how you develop your musicality from day one.
This is also the reason that many players who stick to TAB and sheet music for many years start to feel like something is missing. One student put it well when he said he felt like a ‘guitar operator’, instead of a musician. By developing your inner musician, you avoid the plateau of boredom, tediousness and ‘emptiness’ that can set in after playing mostly TAB or sheet music for a few years.

3. Learning by ear allows you to explore your own taste
Your taste in music is what makes you into a unique musician. Every artist has their own blend of influences that makes them special. As a musician, your ability to figure out music by ear is critical in being able to explore your taste. You’ll be able to learn anything you like without needing sheet music or a YouTube tutorial, whether its a movie soundtrack, video game music, some obscure band, or a B-side that no one seems to care for, but that you know is pure genius… It’s a great feeling when you don’t have to rely on lesson videos, TAB sites or sheet music to play the music you love.
But it’s not just practical to be able to learn music by ear. By figuring things out yourself, you’ll also gain a much better understanding of the song at hand, and music in general. It ingrains the sound in your ‘musical system’ in a much deeper way than when you’re just copying a tab. You'll gain a more thorough understanding of what’s going on in the music.

4. Learning by ear trains you to hear in greater detail
When you work out music by ear, you’re listening to music with a lot of focus. This trains your ability to perceive music in finer detail. For example, you’ll be able to pick out all the different instruments and hear what they’re playing, note by note. You’ll be able to identify subtler sounds within the mix, and discern individual notes in faster guitar licks. I like to call this ‘hearing in HD’. You can compare the difference to watching a pixelated, low-quality YouTube clip uploaded a decade ago, versus seeing a high-quality video on a 4K screen. Overall, this ability will enhance your listening experience and allow you to enjoy music on a deeper level.
Section 1
How to learn riffs and melodies by ear
Guitarists often skip this and proceed to their instrument immediately. But if you can’t hear the music in your head correctly, you will learn the song the way you think it is, rather than how it actually is. It’s like building a house without carefully looking at the blueprint. You’ll end up with a house, but it won’t be the one in the plans.
A great way to check if you can imagine the music in your mind, is to sing, hum or whistle the music. Like these kids:
Now, you don’t have to be a great singer. You don’t even have to sing in tune. The point of this is to see whether what you hear in your head matches up with the music.
Once you have a rough idea of what a song sounds like, you can start figuring out the song and finding the notes on the fretboard (or any other instrument you play). Here's the step-by-step plan to transcribe a riff or melody.
1. Listen to the very first note and hum it
Focus on the first note and try to match it with your voice. See if you can hum it or sing it. If you plug one ear with your finger, it can be easier to hear yourself. Also, pausing the music right after the first note has played helps to focus on it.

2. Find the very first note of the melody
Now, while you’re humming the note, let your hand float towards the fret that you think will give you the right note. This is an intuitive process, so don’t overthink it! Is it the correct note? Is it higher? Lower? Try to slide up or down the string you’re on, until you find the note you have in mind. In the beginning, finding notes will be a lot of trial and error and that’s entirely okay! With practice, you’ll get faster at this.

3. Write the note down
Found the note? Great! Be sure to write it down. Writing the note down helps you keep track of where you are. I like using TAB for this, because it gives you both the note and the position on the fretboard where you’re playing the note.

4. Repeat the process until you've found all the notes
Now that we have the first note, focus on the second one. Is this second note higher or lower than the first note? Or is it the same note? Try and find the right fret. To make things easier, stay on one string. Just slide up or down, until you find the correct note. Once you find it, write it down and repeat the process for each note until you've found the whole riff or melody.

5. Figure out the easiest way to play it
If you stick to one string as I recommended in the last step, the melody might be a little hard to play. So once you’ve found all the notes, now it's time to look for a way to play the melody where you don’t have to move up and down the fretboard as much. To do so, you’ll have to move some of the notes to other strings.
To move a note to a different string, you need to do a little math. When you go one string higher (that is, higher in pitch and physically closer to the ground), that’s the same as moving up five frets. So if you then slide back five frets, you’ll have found the exact same note! For example, the seventh fret of the A string is the same as the second fret of the D string. (Sidenote: there’s one exception to this math: when you're moving from the g string up to the b string, which is four frets instead of five!)
Bonus tip: Slow down the music
Sometimes, it can be a bit easier to learn songs by ear when you slow down the music a little. I use The Amazing Slow Downer or Transcribe! for this, but you can also use VLC Media Player, Audacity or Tune Transcriber which are all free. YouTube also has a built-in option: just click the gear icon in the bottom right and you can select a different playback speed.
Don’t slow down the music too much though! As a rule of thumb, if you need to slow the tune down to more than 75 percent of the original tempo, it might be a good idea to find a song that’s a bit easier. You want to find songs that are challenging but not overly so. Plus, if the music is way too fast for you to hear what’s going on, it might still be a bit too fast for you to play anyway.
How to start learning riffs and melodies by ear
The plan above shows you the basic steps you need to go through to figure out a song by ear. So, what would be some good songs to practice? I’ll give you two sets of songs to practice: some beginner songs and a few slightly more challenging tunes to figure out by ear.
Beginner songs to learn by ear
Here are some suggestions for songs that aren’t too fast or hard to hear:
• Alt-J - Breezeblocks
• The Kills - Future Starts Slow
• LCD Soundsystem - Daft Punk is Playing at My House
These are all songs you'll learn in my course Make Your Ears Awesome: Kick-Starter. It makes things easier by providing note-by-note help for each song you figure out. Let me show you how. Grab your guitar right now and we'll get started by figuring out this next riff by ear.
Hope figuring out that riff went well for you! If you want some more practice with note-by-note help, check out Make Your Ears Awesome: Kick-Starter. This course will help you figure out 24 songs by ear, exactly like this! Try the first couple of lessons of the course for free by getting the sample course:
Slightly more challenging songs to learn by ear
Maybe you want a bit more challenge. If so here are some more song suggestions for you, ordered roughly from easier to more challenging.
• The Strokes - New York City Cops
• The White Stripes - Seven Nation Army
• MGMT - Kids
• Red Hot Chili Peppers - Otherside
You'll learn all of these songs in my course Make Your Ears Awesome: Riffs and Melodies. This course is a step up from Make Your Ears Awesome: Kick-starter. Instead of giving you help with each note, I'll let you fill in the entire riff on your own. Also, there’s a so-called ‘hard mode’ where you have to figure out on what string to play the note as well!
We’ll check it out with a song by The Kaiser Chiefs. Listen closely to the riff and then grab your guitar to figure out the very first note. Next, fill out that note in this interactive tab and hit the 'check tab' button to see if you got the first note right. Got that first note right? Keep going and see if can get the entire riff right!
If you enjoy this way of learning songs by ear, check out Make Your Ears Awesome: Riffs and Melodies. The course will help you learn 51 riffs and melodies exactly like this. You can also try the first couple of songs for free as part of the sample course. It includes a song by the White Stripes and one by the Red Hot Chili Peppers.
Hey, but what about chords and chord progressions? How would you go about learning those by ear? Keep reading, because that's what we'll explore in the next section!
Section 2
How to learn chords and chord progressions by ear

Just like figuring out riffs or melodies by ear, learning chords by ear is not some innate ability that you either have or don't have. Working out chords by ear is a skill you'll learn with practice. All you need to do is stay calm, don’t panic, and go at this one step at a time.
Now, you might be wondering whether you need music theory to figure out chords by ear. The short answer is that it can definitely help, but you don’t need to know a lot of theory to get started. I’ll show you with this step-by-step plan to figuring out chord progressions by ear!
1. Tune into the bass
The lowest note in music determines how all the other notes will sound. That’s why harmony always starts with the bass note. So, the first thing you want to do, is listen closely and tune into the bass line. This may take some practice, because we're used to listening to instruments that take a more prominent place in the mix, such as the guitar or vocals.

Bonus tip: use an equalizer
If you're using something like Apple Music, Spotify or VLC media player you can try boosting the bass frequencies using the equaliser. This can make it a bit easier to tune into the sound of the bass. It depends on the recording, but generally speaking it should help to boost anywhere from 60 to 400 hertz. So experiment with that area until you find a setting that makes the bass easier to hear for you. Also, keep in mind that earbuds or laptop speakers often don't have the most powerful low end. So trying a different pair of headphones or speakers might also make it easier to hear the bass.
2. Figure out the bass part
Now that you’ve tuned into the bass, it’s time to figure out what the bass is playing. First, make sure you've got the bass line in your head. Check this by singing or humming along with it. Next, figure it out one note at a time, until you've found the first five to ten seconds of the song. This process is pretty similar to learning riffs and melodies by ear, as described above.
3. Figure out the root note
The next step is to listen to the bass line and figure out which note is the so-called ‘root note’. Think of the root note as the foundation of a chord. It determines the 'letter' we use to name a chord. For example, the root note in a B minor chord is B.
Determining which note is the root requires you to listen to which note is emphasized in the bass. You’ll get better at this with experience, but there a few things to look for. Listen to which note the bass plays the most often and the longest. Listen to which note the bass plays on the first beat (‘the one’) of a new bar (a.k.a. measure). And on which note does the bass sound the most 'at rest'? Those are all things that can help you figure out the root note.

4. Check if the chord on the root note is major or minor (or neither)
Say you found the first root note is G. Now we want to find out what type of chord we’re dealing with. Try playing a G major chord and a G minor chord. If you play both options along to the song, you’ll hear that one of them sounds pretty good while the other hurts your ears a bit and sounds plain wrong. So that will tell you if the chord is major or minor!
Now, there’s a small chance that a major and minor chord both sound wrong. If so, you might have gotten the root note wrong, or you’ve run into a more ‘exotic’ chord type. This is where it helps to have your ‘chord library’ in order, so you can try a few different chord types. Here’s a few options to check:
• half diminished chord
• diminished chord
• augmented chord
• sus chord (sus2 or sus4)
• a slash chord (i.e. a chord where the bass isn't playing the root note)
Don’t worry too much about this though! Below I’ll give you some suggestions for songs to figure out by ear where you don’t have to worry about these more ‘exotic’ chord types.

5. Check if you need to add an extra note to make it into a seventh chord
If you found a major or minor chord in the last step (i.e. not one of the exceptions I mentioned), the sound of the chord might still be a bit different. This is most likely because this chord has one or more additional notes that give it a richer sound. The first options you should check:
• dominant chord (for example: ‘G7’)
• major seven chord (for example: ‘Gmaj7’)
• minor seven chord (for example: ‘Gm7’)
• major minor seven chord (for example: ‘Gmmaj7’, this one’s rare)

6. Repeat this until you’ve found all the chords
Repeat these above steps until you’ve found all the chords! Very often, songs only use three or four chords, so this can go quite fast. Also, remember that once a chord has been used once in a song, there’s a big chance it’ll be used again!
How to start learning chords and chord progressions by ear
The next step is of course to start figuring out some chord progressions by ear! So up next, I'll give you a couple of suggestions for songs that you can figure out by ear.
Now, in order to figure out a chord in a song, you of course need to be able to play that chord in the first place! For example, if a song has a Ab7 chord in it, but you don’t know how to play it, that’s going to be tough.
So, to keep this guide actionable for everyone, I'll provide a list of songs you can get started with in three 'levels':
- Level 1: You know all the major and minor open chords (i.e. E, Em, G, A, Am, C, D, Dm)
- Level 2: You also know how to play major and minor chords in all keys
- Level 3: You also know how to play various seventh chords in all keys
Side note: to learn all the open chords along with a couple dozen song examples, check out Guitar Chord Bootcamp: Open Chords. If you want to be able to play all the songs in level 2 and level 3, check out my course Guitar Chord Bootcamp: Barre and Beyond. You'll cement the 96 most commonly used chords into your brain, including major, minor, dominant, major seven, minor seven, diminished and half-diminished chords.
Anyway, here are some suggestions for songs you can get started with, depending on your chord knowledge. Songs with clear bass lines that are relatively easy to hear.
Level 1: I know how to play all open chords
• Nick Cave - Death is Not the End
• Outkast - Hey Ya!
• REM - Everybody Hurts (except the bridge)
Level 2: I know how to play major and minor chords in all keys
• Bob Marley - Jammin’
• Radiohead - Creep
• Arctic Monkeys - Cornerstone
Level 3: I know how to play major, minor and seventh chords in all keys
• Otis Redding - Sittin’ on the Dock of the Bay
• Queen - Don’t Stop Me Now
• Jack Johnson - Sitting, Waiting, Wishing
Now, let’s dive straight in and figure out a song by ear right now! The only chords you need to know for this song are A, D and G. I'll take you through it step by step, chord by chord.
Start by listening to the first 20 seconds of this REM song. It will loop automatically in the video below. Then take another listen, and try to really focus on the bass guitar. Notice the bass only plays two different notes. It starts at 0:05 with one note, then switches to the second at 0:09, before returning to the first note at 0:12. Find those two notes, and you’ve found the two chords in this song! The chords you can pick from are: A, D and G. Fill out and check your answers below.
(Note that I’ve added ‘repeat’ to the second and fourth bar. This means you need to fill in the same chord as in the previous bar.)
If you enjoyed this exercise, be sure to check out my course Make Your Ears Awesome: Chord Progressions. It takes you through a total of 57 songs, so you get better and better at figuring out songs by ear. It's part of your membership if you're a StringKick All Access Member of course.
Not a member yet? Click the button below to check out the first couple of songs for free!
The step-by-step plan I've outlined above is the place I'd recommend anyone start when they want to figure out chords and chord progressions by ear. It's vital that you pick up the skill of listening to a recording and finding those sounds on your fretboard. It might take you a while at first, but with practice you’ll get much better at it!
Section 3
More ear training resources
It might seem like a huge project to tackle. But if you just spend 5 or 10 minutes every day figuring out a riff or melody, you’ll see that your skills will improve dramatically within a few weeks. In short, the most important thing is to take action!
So, in this section I want to give you a quick overview of some more ear training resources to continue your ear training journey.
Make Your Ears Awesome: Kick-Starter
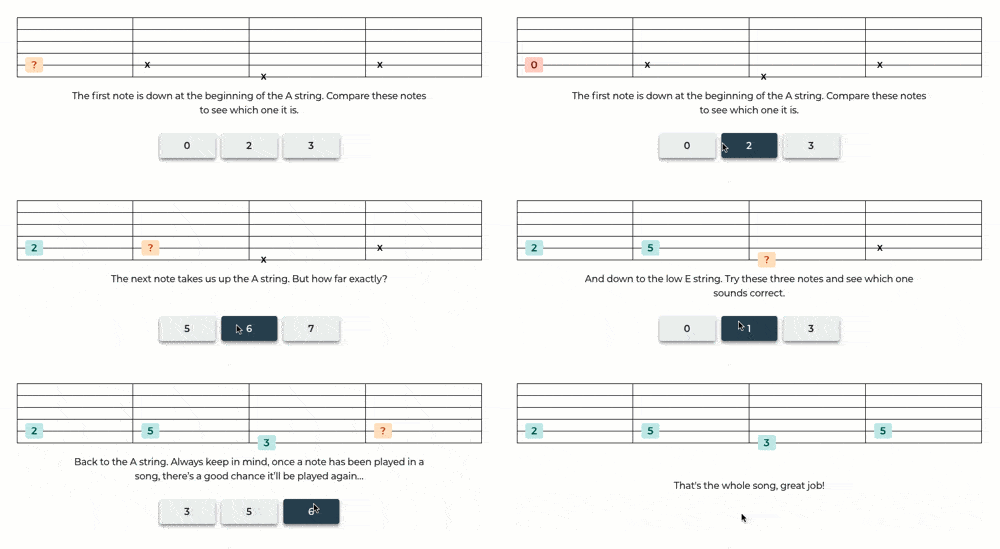
Make Your Ears Awesome: Kick-Starter is the best place to get started with ear training. It helps you figure out 24 songs by ear with note-by-note help and instructions. Try the first couple of songs for free by enrolling in the sample course!
Make Your Ears Awesome: Chord Progressions
Make Your Ears Awesome: Chord Progressions is similar to the one above, except it's all focused on figuring out chord progressions by ear. You'll go through 57 songs with the help of my detailed notes and instructions for each song as well as this interactive chord progression tool:
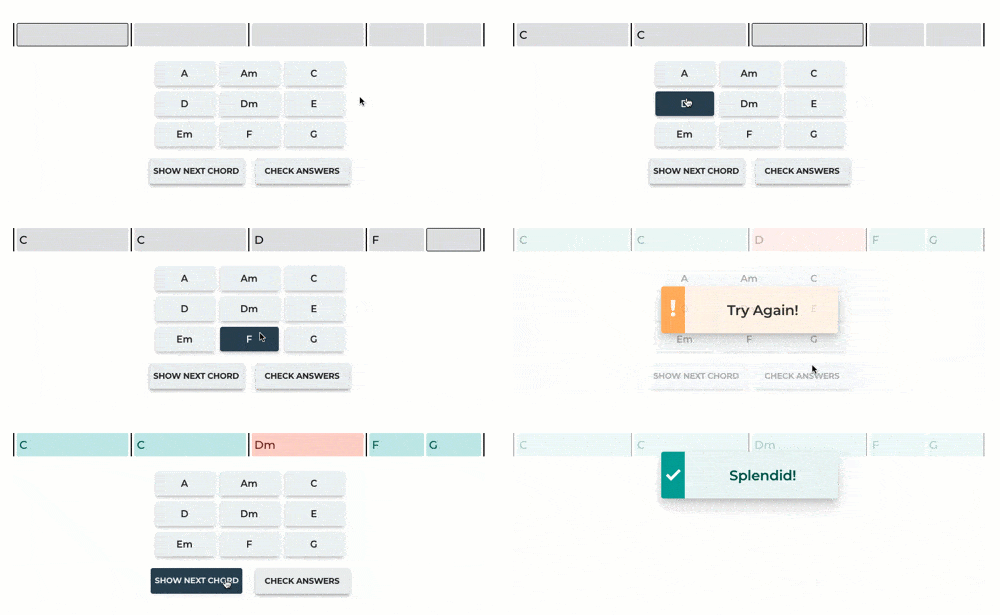
You can check out the first couple of lessons to see if you like it. Hit the button below to try it!
Guitar Ear Training: 9 ways to train your ears (that actually work)
This article explains why ear training is important and how it’ll help you on your musical journey. It covers the 3 core ear training skills and discusses the 9 best exercises. Check it out here!
How to Play Guitar by Ear
This article focuses specifically on your ability to hear a sound in your head, and to somehow get that sound out of your instrument. It gives you 5 different exercises to get better at this. Read it here!
How to Improvise on Guitar
As explained in the article above, improvisation is also a great way to train the connection between your head and your hands. It’s important though that you activate your musical imagination, instead of memorising a scale shape and pressing random frets. This guide shows you how. Check it out here!
That’s all for this guide! Remember, learning songs by ear is simply a matter doing it. Even if it seems overwhelming now, start small and you’ll see yourself improve. Slowly but surely, you’ll feel your playing becoming more natural as you strengthen the connection between your head and your hands. The freedom to play what you hear in your head is one of the rewarding parts of music!
If you need any help learning songs by ear or if this guide can be clearer or better in any way, please don't hesitate to let me know! Simply email me: just(at)stringkick.com!


![Title image for How to Play Guitar by Ear [Step-By-Step Plan]](https://www.stringkick.com/wp-content/uploads/2015/04/Play-by-Ear.png)

![Title image for How to Improvise On Guitar [Easy Guide]](https://www.stringkick.com/wp-content/uploads/2019/05/Improvise-Purple-315x175.png)
![Title image for Diatonic Chords and Harmony [Easy and Practical Guide]](https://www.stringkick.com/wp-content/uploads/2023/03/Diatonic-Chords.png)
