
Strumming can feel really awkward and unnatural at first.
But don’t worry! With the right technique and some focused practice, strumming a guitar will become as easy and effortless as riding a bike.
In this article, I’ll show you how!

We’ll start off with some vital rhythm guitar tips that will make strumming a lot easier.
Next, I’ll show you a step-by-step plan to learn a new strumming pattern, that helps you tap into your innate sense of rhythm. After all, StringKick is all about developing your musicality!
We’ll then explore 7 popular strum patterns, from easy to more advanced, all with song examples, so you can hear what they sound like in ‘real music’.
Lastly, I’ll tell you a bit about Strumming Skills Bootcamp.
Alright, let’s dive in!

1. Never stop moving your strumming hand
Keep your strumming hand moving at all times, even when you’re not hitting any strings for a couple of beats. By doing this, you don’t have to think about when you need to move your strumming hand: it’s moving all the time. Constantly moving your hand also makes it much easier to keep time. We’ll take a closer look at how this works later in this guide.

2. Keep a loose wrist
Make sure you're not locking your wrist: you need to keep it nice and loose.
Most of the movement will come from rotating your lower arm (you could also say: twisting your wrist) and letting your hand and wrist hang loose and follow that motion. (Funk guitarist Ross Bolton calls this a ‘drunken wrist’. I like that.)
You might be tempted to make the up and down movement with your lower part of your arm (your forearm), but though your lower arm will be moving up and down a little bit as well, that’s only a small part of the movement.

3. Keep a light grip on your (thin) pick
It’s totally normal to want to hold on to the pick tightly, because you don’t want it to move and you don’t want to drop it. But by gripping it too tight, you make it hard for the pick to move past the strings smoothly and it might get caught up in there somewhere. Also: it’s really hard to keep your wrist nice and loose when your gripping your pick tightly. By holding your pick with a light grip, you allow it to glide over the strings easily.
If you’re not used to playing with a pick, it can really help to practice with a thin pick that’s nice and bendy. As you progress, try thicker picks too though, as they’ll give you a bit more control over your sound.

4. Don’t hit all the strings with every strum
You might think we need to hit all the notes in a chord with every strum, but very often we hit just three or four strings.
So which strings should you be hitting? A good rule of thumb is to hit either all of the strings or just the lower (thicker) strings on every downstrum. Then on the upstrum, hit only the highest (thinnest) three or four strings. This approach will make the downstrums sound a bit heaver and give your upstrums a bit of a lighter sound. And: it’ll be a little easier to play!
When you’re strumming, you want to tap into that innate sense of rhythm as well. That’s what will make strumming feel easy and natural.
Experienced musicians do this automatically. It’s why they’ll say things like ‘just play what you feel’ or ‘I never think about strumming, I just do it’. Of course, once upon a time, strumming was hard for them too! It’s just too long ago for them to remember.
Strumming is a lot like riding a bike in that way. It takes a bunch of practice at first, but once things click, it feels like the easiest thing in the world.
So, how exactly do you go about using your natural sense of rhythm to strum a guitar? Let’s take a look at how you should learn a strum pattern, step by step!
Before we get going, check out this quick video from my course Strumming Skills Bootcamp which has a quick explanation of how rhythm works. (Naturally, the course is included in your membership if you're a StringKick All Access Member!)
Next, let’s take the simplest strum rhythm possible as an example.
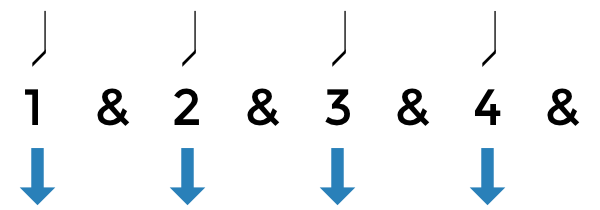
As you can see, we need to strum on each beat. So, how exactly would we get rhythm like this into our system?
Here's a three step plan!
How to Learn a New Strum Pattern

Step 1: Say it before you play it
Strumming patterns involve strumming down and strumming up. Now, while it’s important to get this right, many players get a little caught up in the mechanics of when your strumming hand needs to go up or down. It makes them lose the connection with their natural sense of rhythm.
It’s impossible to play a rhythm without hearing what it should sound like in your head. So before you even touch your guitar and before we look at the downstrums and upstrums, we want to get the rhythm in our system. You want to be able to imagine in your mind what the strumming rhythm sounds like. You want to hear it in your head.
A great way to check if you really ‘know’ the rhythm is to sing, hum, beatbox, tap or say it out loud. In other words: say it before you play it. ‘Cause if you can’t do that, playing a solid strumming groove on guitar will be impossible.
For an example of how to do this with our rhythm, check out the video below, again from Strumming Skills Bootcamp.

Step 2: Practice the strumming rhythm on just one chord
Once you have the strumming rhythm in your mind, it’s time to start playing it. Now, when you’re learning something new, you want to focus on one thing at a time. So, you don’t want to focus on playing your new strum pattern and have to think about changing chords.
Instead, you want to play the strum rhythm on just one chord. This allows you to devote all your attention to the strumming. Below is a quick ‘one chord song’ from Strumming Skills Bootcamp, completely played on a G chord. So grab that chord and play along!

Step 3: Practice the strumming rhythm on a real song
Once you’re comfortable playing the strum rhythm on one chord, it’s time to try it out in a real song! The challenge here is to keep that strumming pattern going while you switch between chords too.
This tune by Lee Hazlewood uses our ‘strum on each beat’ strum pattern, while also switching between a few chords. See if you can play along with it! When you play the video, the right chords will automatically light up, so you know where you’re supposed to be.
(Sidenote: I've simplified the chords a little bit. But if you want the 'fancy' version which includes the Dmaj7 chord, flick the toggle to the top right of the chord progression!)
7th Chords
No 7th Chords
Hope you enjoyed this quick example! To learn more strumming patterns like this, check out Strumming Skills Bootcamp!
The course is totally included in your membership if you're a StringKick All Access Member. If you’re not a member, you can check out the first couple of lessons of the course for free. Check it out!
Want to know a bit more about the course first? Find out more here.
Strum Pattern #1 Downstrum on every beat
When strumming a guitar, you’ll use both downstrums (i.e. where your strumming hand moves down) and upstrums (where your strumming hand moves back up). There’s a simple logic behind when you should strum down or up, which we’ll get to shortly.
All the strum patterns we’ll be looking at in this section are in a 4/4 measure. In short, that means that the music is divided into groups (called ‘bars’ or ‘measures’) that consist of four beats. (See the Rhythm Basics video in section 2 for a more detailed explanation of this.)
For this first pattern, simply play a downstrum on every beat.
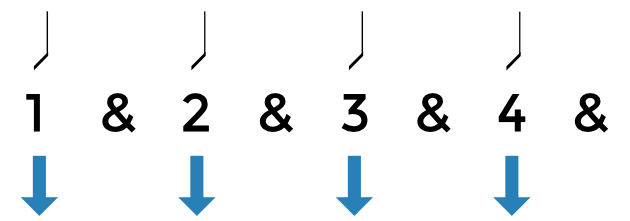
Check out the first thirty seconds of this song for an example of this simple, but effective pattern:
Strum Pattern #2 Adding two upstrums
Now that you’ve gotten a basic feel for this strumming thing, the next step is to start adding some upstrums. Here’s a pattern that's similar to the first pattern we saw, but with two upstrums added in.

To hear this pattern in action, check out this song. See if you can recognize it.
(Note: If you want to play this song, listen closely! In the fourth bar, they've sneakily removed two beats. So you'd count 1-2-3-4, 1-2-3-4, 1-2-3-4, 1-2, and then you repeat.)
Strum Pattern #3 Adding three upstrums
This next pattern is similar to the last one. We'll add in just one more upstrum.

See if you can hear it in this song.
Here's another song example that's a bit faster:
Strum Pattern #4 Downstrum on the downbeat, Upstrum on the upbeat
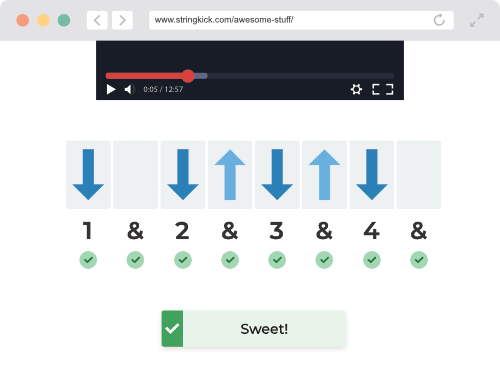
You might have noticed a certain logic in when we’re playing downstrums and when we’re playing upstrums: all the downstrums are on what we call ’the downbeat’: on the 1, 2, 3 or 4. All the upstrums are on what we call ‘the and’ or ‘the upbeat’: right between the 1, 2, 3 and 4. They’re always on the ‘&’. This next pattern shows this basic logic:
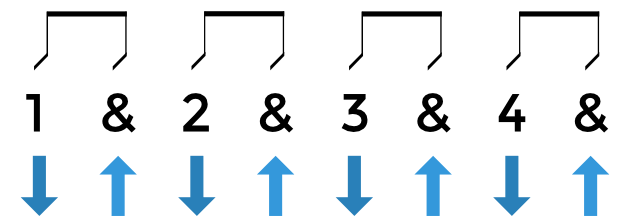
As you can see, we're strumming our instrument both on the downbeats and on the upbeats. This is a very common pattern. Listen to this song by Fleet Foxes for example.
Strum Pattern #5 Skipping a downstrum
Once you’re comfortable playing down and upstrums, there’s just one more thing you need to learn to complete your basic strumming technique. So far, you might've noticed two things:
1. You’re strumming hand keeps moving up and down all the time. 2. You’re playing downstrums on the beat (1, 2, 3, 4) and upstrums on the upbeat (in other words: on the &).
I chose strumming patterns up until now where it feels sort of natural to do these two things. But there are also patterns where you might be tempted to break these ‘rules’. Take a look at this next strum pattern for example:
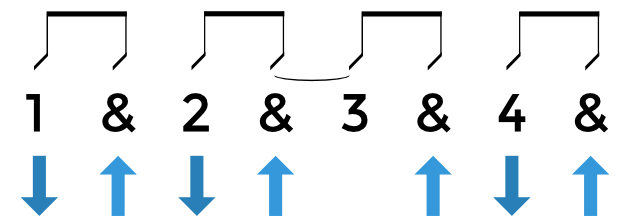
See how this pattern skips the downstrum on the three? As a result, it has two upstrums following each other, without a downstrum in between. This probably feels a little weird to play at first, but it's just a matter of getting used to it. Practice! Be careful that you don't play a downstrum on the 3& instead of that upstrum. That would interrupt the downstrum-upstrum logic your hand is following.
Listen to this next song to hear what this rhythm sounds like.
Strum Pattern #6 Skipping an upstrum and a downstrum
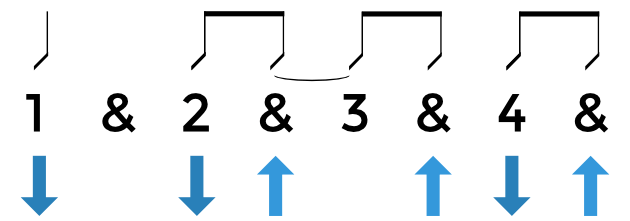
This next pattern has the same challenge as the last one: we're skipping a downstrum on the 3 (i.e. the third beat). Because of that, we have to play two upstrums in a row which can feel awkward at first.
This is a very common strum pattern though. Just check out these song examples:
Strum Pattern #7 The one with the long pause
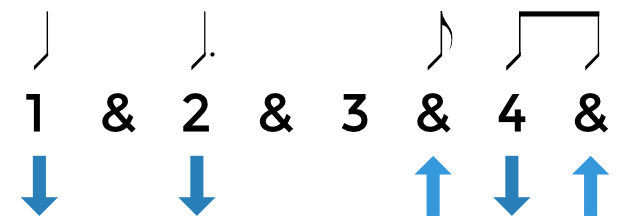
Now, for our final strum rhythm! The next pattern has you play fewer strums, which might seem easier, but can be pretty tricky.
The challenge is to keep your strum hand moving during that long pause between the 2 and 3&. It's tempting to stop moving your hand, but you need to keep it moving at all times! Even when you’re not hitting any strings, your hand needs to keep going up and down. This is essential to keeping a steady rhythm. Check out this song to hear the strum pattern in action:
Here's a slightly more rocky example:
So, that was the last of our seven essential strum patterns! Hope you enjoyed this little guided tour!
If you want to learn to play these strum patterns, check out Strumming Skills Bootcamp.
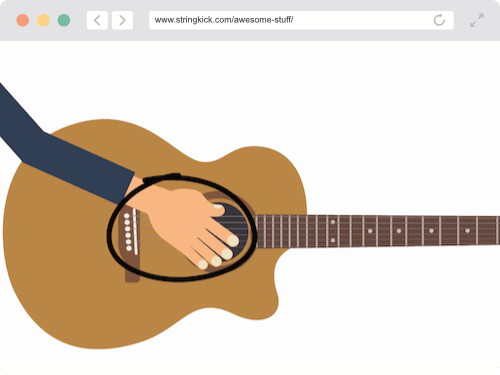
Strumming Skills Bootcamp will teach you how to play all of these strum patterns and more! You'll practice them through 'one-chord-songs' made specially for the course as well as dozens of songs by artists like the Beatles, the White Stripes, Oasis and Arcade Fire.
Each of the songs comes with a chord progression that highlights what chord you should play, making it super easy to follow along.
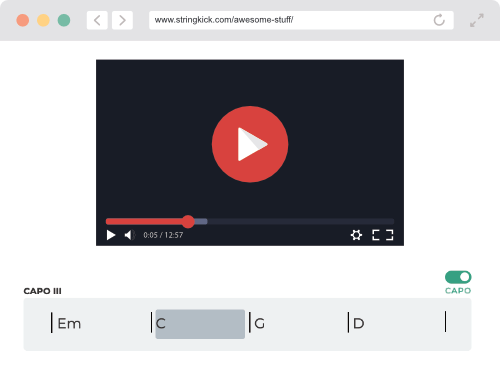
It's all laser-focused practice to get the right strumming technique into your system. By making strumming automatic, you won’t have to think about how to move your strumming hand anymore. It's what makes strumming feel effortless and natural.
Some more things you'll learn:
- How to use a capo
- Play with a straight or a swing feel
- Figure out how to play a strum pattern by ear
You can find out more about the course here or simply get started with free sample course. This mini-course includes the first couple of lessons of the full course.
CONCLUSION
The power of strumming
You know what they say. It ain’t mean a thing, if it ain’t got that swing. Music always starts with a solid rhythm. You can even get away with playing ‘wrong’ notes or weird chords as they’re properly timed. That’s the power of rhythm.
I hope this article has helped you understand how to strum a guitar and has give you some good practice to get it in your system. Proper strum technique helps you tap into your innate sense of rhythm! And as you may know, I’m all about helping you use and develop those inner music skills that make playing music feel natural. (Read more about that here!)
As always, if you have any questions, get in touch with me here or simply email me at Just (at) Stringkick.com.


![Title image for How to Play Bar Chords: Shapes, Technique, Exercises [Ultimate Guide]](https://www.stringkick.com/wp-content/uploads/2015/04/Barre-Chords-Title-Image.png)
![Title image for Diatonic Chords and Harmony [Easy and Practical Guide]](https://www.stringkick.com/wp-content/uploads/2023/03/Diatonic-Chords.png)

![Title image for Learn Music Theory for Guitar [5-step Roadmap]](https://www.stringkick.com/wp-content/uploads/2022/02/Music-Theory-for-Guitar-Main.png)

![Title image for How to Learn Songs by Ear [Complete Step-by-Step Guide]](https://www.stringkick.com/wp-content/uploads/2015/04/Learn-Songs-By-Ear-Orange.png)


